Master Bedroom Update: Planning
After finishing updating our guest room, our master bedroom has been looking plain and boring to me. It is the ugly step-sister to our Cinderella of a guest room. I’ve been working on a plan for how to update our room and give it some more style, so I thought I’d share that today.
A couple of weeks ago when I was at Winners, I picked up a roll of wrapping paper that is a beautiful Ikat-ish stripe in pink, orange and white. I really love the colour combination, so I thought it would be fun to layer those colours into our currently purple, white and black bedroom. Our room is currently looking something like this:

This picture is from right after we moved in, but it’s looking pretty much the exact same just over a year later.
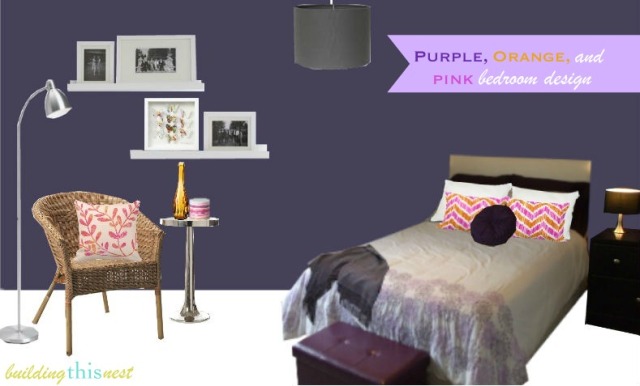
I just discovered Pixlr a few days ago and have been playing around on it ever since. This tutorial from Centsational Girl is fantastic and gives you easy to understand instructions on how to use Pixlr to layer furnishings and design a space. It’s similar to Photoshop, except it’s free! I used it to create an idea of where I want to go with the bedroom update. Please forgive me for it’s crudeness, I’ve only been playing around with the site for a few days!
My plan is to move the bed off of the purple wall and over to the right wall of the room (the wall opposite the window). The nightstands should fit in just fine on either side of the bed and there should be room for the purple bench at the foot of the bed still with room to walk around it to the far side of the bed. In the left corner of the room, I want to create a little reading nook. I’ll put a chair, tall reading lamp and a little side table there. I also like the look of the picture ledges on that corner to break up some of the darkness of the purple wall. I’ll bring in the orange and pink with some throw pillows for the bed and chair, as well as accents on the side table and pictures on the ledges. I was thinking I could use some of the wrapping paper I have and use it as picture matting in frames with black and white photos. I also found a beautiful piece of butterfly art from IKEA that I plan on doing a DIY knock-off version of.
The other side of the room is somewhat awkward to work with since we have a tall dresser with a TV on it and the closet door is over there as well.

I think moving the bed to the right wall will help to fill in some of that empty space that we currently have between the end of the bed and the dresser, but I’m not sure what I’ll do with that side of the room to make it not so plain looking. Any ideas?
It’s probably going to take me a little while to get this all pulled together. I’ll likely look for some of the elements at thrift stores to save some money, like the chair and the side table (the table I put into my design is clearly WAY over budget, but the size was right so that’s why I put it in there lol). I’ll also probably be making my own pillows since they can be so darn expensive to buy! I found a few things at IKEA for pretty good prices, so I’ll have to wait until I can get to the nearest one (it’s just over an hour away) before I can really start making my vision come to life. Just one more project to add to the list! :)
Here’s a source list for the items in the room:
- AGEN chair, IKEA, $39.99
- LERSTA reading/floor lamp, IKEA, $16.99
- Trumpet side table, $659 (that price is totally laughable)
- RIBBA picture ledge, IKEA, $9.99 for 55 cm
- Pink, orange and white chevron pillow, zazzle.ca, $73.60 each
- Modern floral plant pillow, zazzle.ca, $69.50 each
- JABBIG unscented block candle, IKEA, $2.99
- LOVLIG vase, IKEA, $2.99
- OLUNDA picture (splash), IKEA, $14.99 (I plan on making my own version of this)
Linking to: Crafty Texas Girls
Comments
5 Responses to “Master Bedroom Update: Planning”Trackbacks
Check out what others are saying...-
[…] ← Master Bedroom Update: Planning […]


I’m gonna give pixler a try. I use pic monkey – which I just posted about. I love it so easy, but doesn’t look like it will do what you have done with the furniture overlays. Love it. Thanks for the tip.
No problem! PicMonkey is great for editing photos, but Pixlr is amazing because you can cut out images and overlay them, sizing and distorting them so that it looks more realistic. The link I provided from Centsational Girl fully explains how to do it. It’s fun and addictive, be prepared for that! lol
You are so organised! That’s how I like to decorate…lots of research, cutting and pasting (literally or on computer) and then make a list. That program looks handy. I’ll definitely be checking it out. Thanks :)
I’m definitely a plan it all out kind of person! I love to see a visual representation of something I have in my mind, so finding this program and (mostly) figuring out how to use it is great! It’s definitely worth checking out :)